Moving to a monorepo: Yes, but how?
Monorepos have been a hot topic in the JavaScript community for a while now. I’ve heard quite a bit about their pros and cons, and you probably have too.
However, if you’ve decided to move to a monorepo it’s not necessarily obvious how to go about it. There are lots of boilerplate examples online, which is great. But what if you want to move existing repositories?
This post is intended as a rough playbook for migrating your existing repositories to a monorepo. Having done that at two different companies, I’ve found a pretty good approach.
Merging repositories
Instead of creating a new repository for the monorepo, I would recommend picking one of your existing repositories as the monorepo destination. The other repositories will then be merged into it, one by one.
Taking this approach, the first step in establishing the monorepo will be merging a different repository (B) into the repository that will become the monorepo (A).
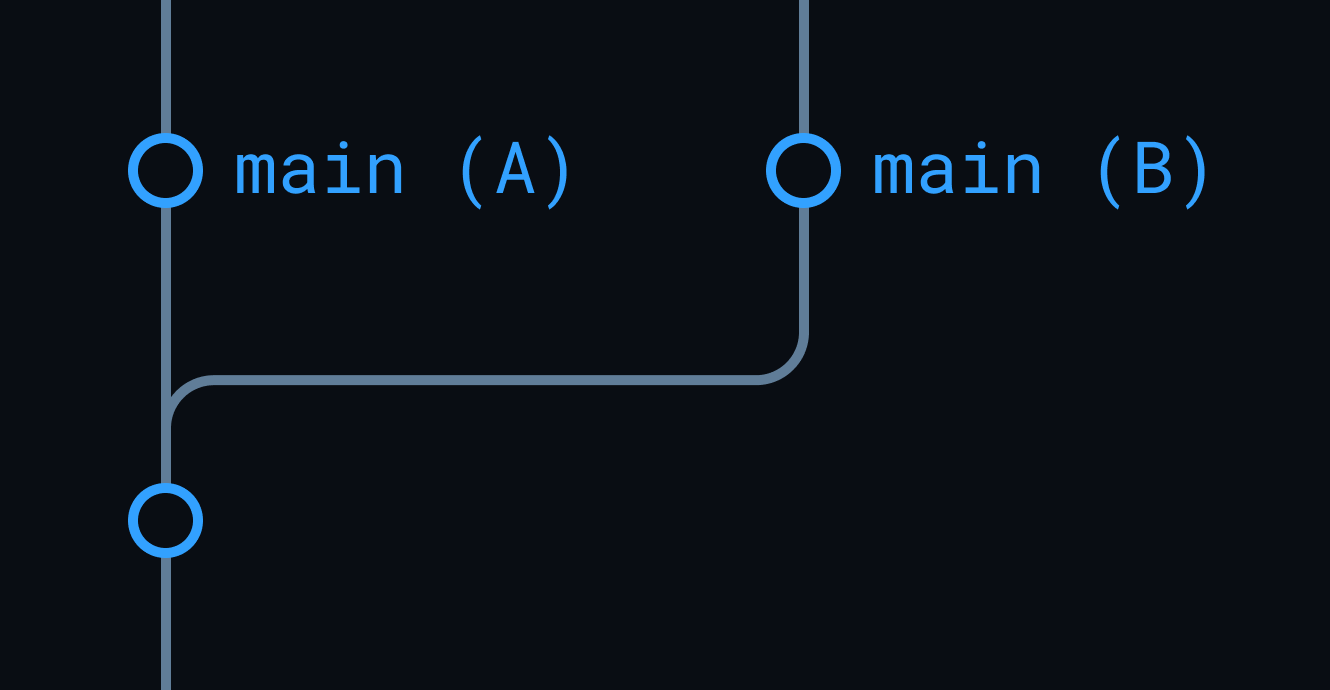
Reusing an existing repository minimizes disruptions to in-flight pull requests for that repository, and avoids having to set up the processes and settings for the repo again.
For this reason, I would advise picking the most active repository as the monorepo destination.
Directory structure
Before the merge, decide what you want the directory structure to look like once the repositories have been merged.
Most standalone repositories tend to have a directory structure along these lines:
# Application codesrc/# External dependenciespackage.json# Various config filestsconfig.json
In a multi-app monorepo, the two main differences are that:
- You have multiple apps, each in their own directory.
- There is likely a directory containing shared code libraries.
# Application code (and app-specific config files)apps/[app-name]/# Shared code librariespackages/[package-name]/# External dependenciespackage.json# Various config filestsconfig.json
The packages/ directory will naturally be created as you extract common logic from your applications into shared code libraries.
However, we’ll need to merge the other categories of files when moving to the monorepo. Let’s take a look at how we can go about merging each of them.
The source code directory
Most repositories hve a single directory, containing the application code for the project, while the configuration and build files typically live in the root (or root-level directories). We’ll call the application code directory src/.
The src/ directory is the easiest to handle. The src/ directory for each repository is moved to apps/[app-name]/src/.
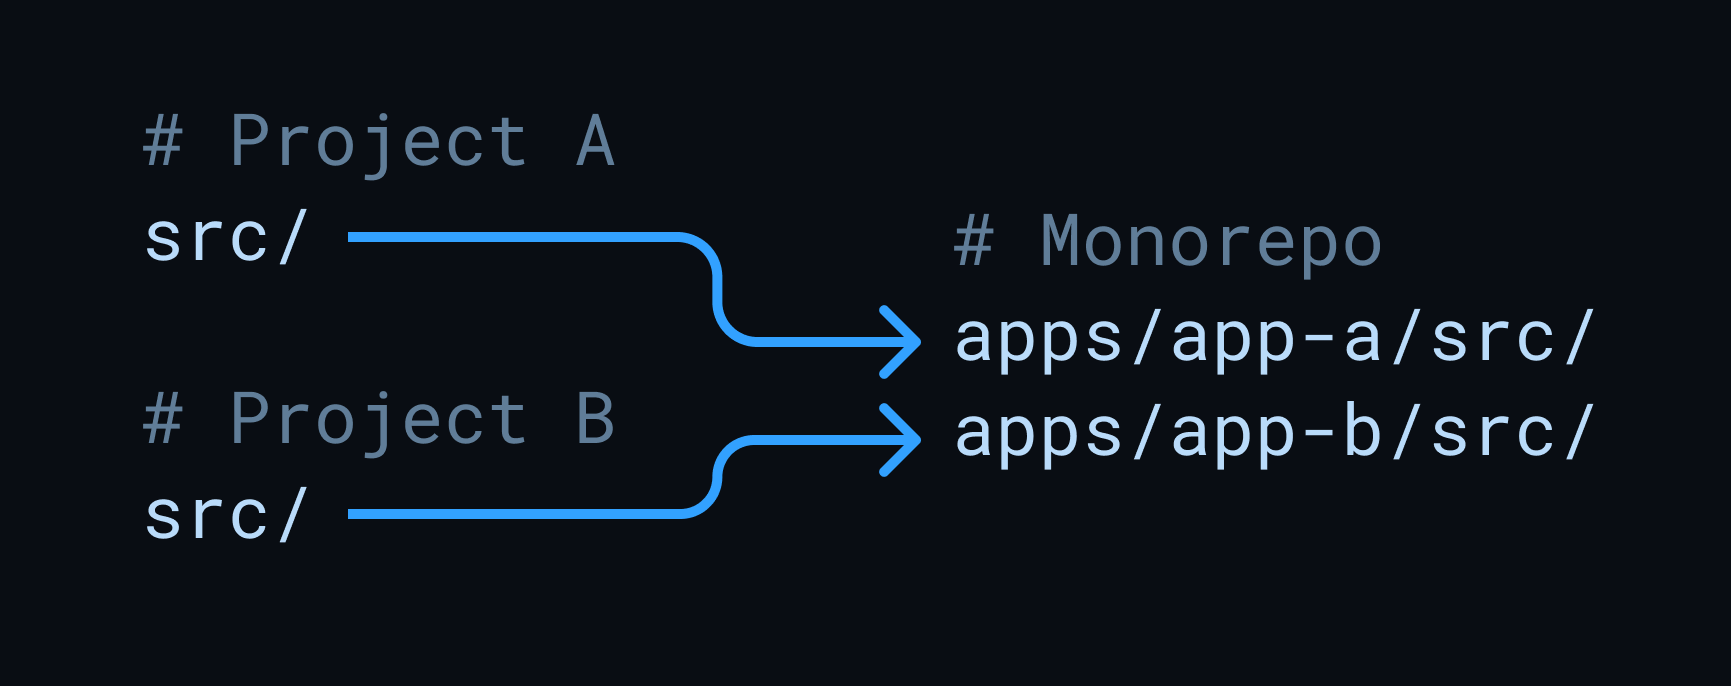
As a rule of thumb, we can consider each directory under apps to be an independently deployed project.
Some repositories may have multiple directories containing application code (e.g. Next.js projects with pages/ and components/ directories), but those are migrated in the same manner as the src/ directory in the example above.
External dependencies
There are two ways to go about external dependencies in a monorepo.
- A single-version policy
- A per-app version policy
Single-version policy
Migrating to a single-version policy is harder up-front. It involves merging the list of dependencies for each project into a single list of dependencies.
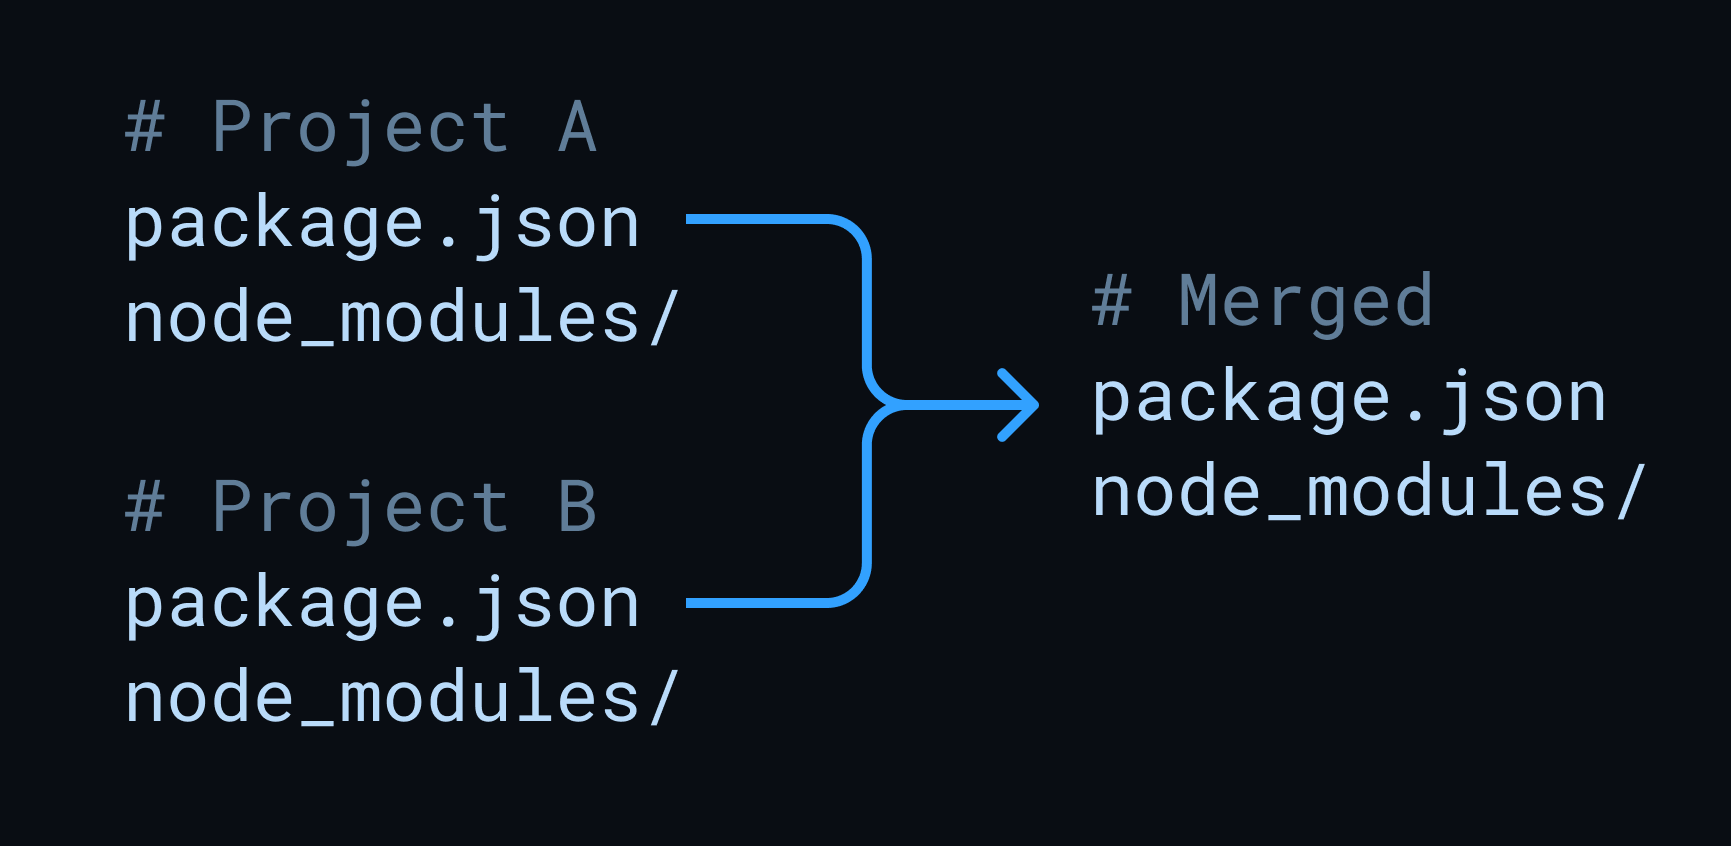
This can be difficult if your repositories are using different versions of the same dependency.
Per-app version policy
Under a per-app policy, each app specifies its own dependencies via its package.json file. This means that the package.json files can mostly be migrated as-is in the same manner as the src/ directory.
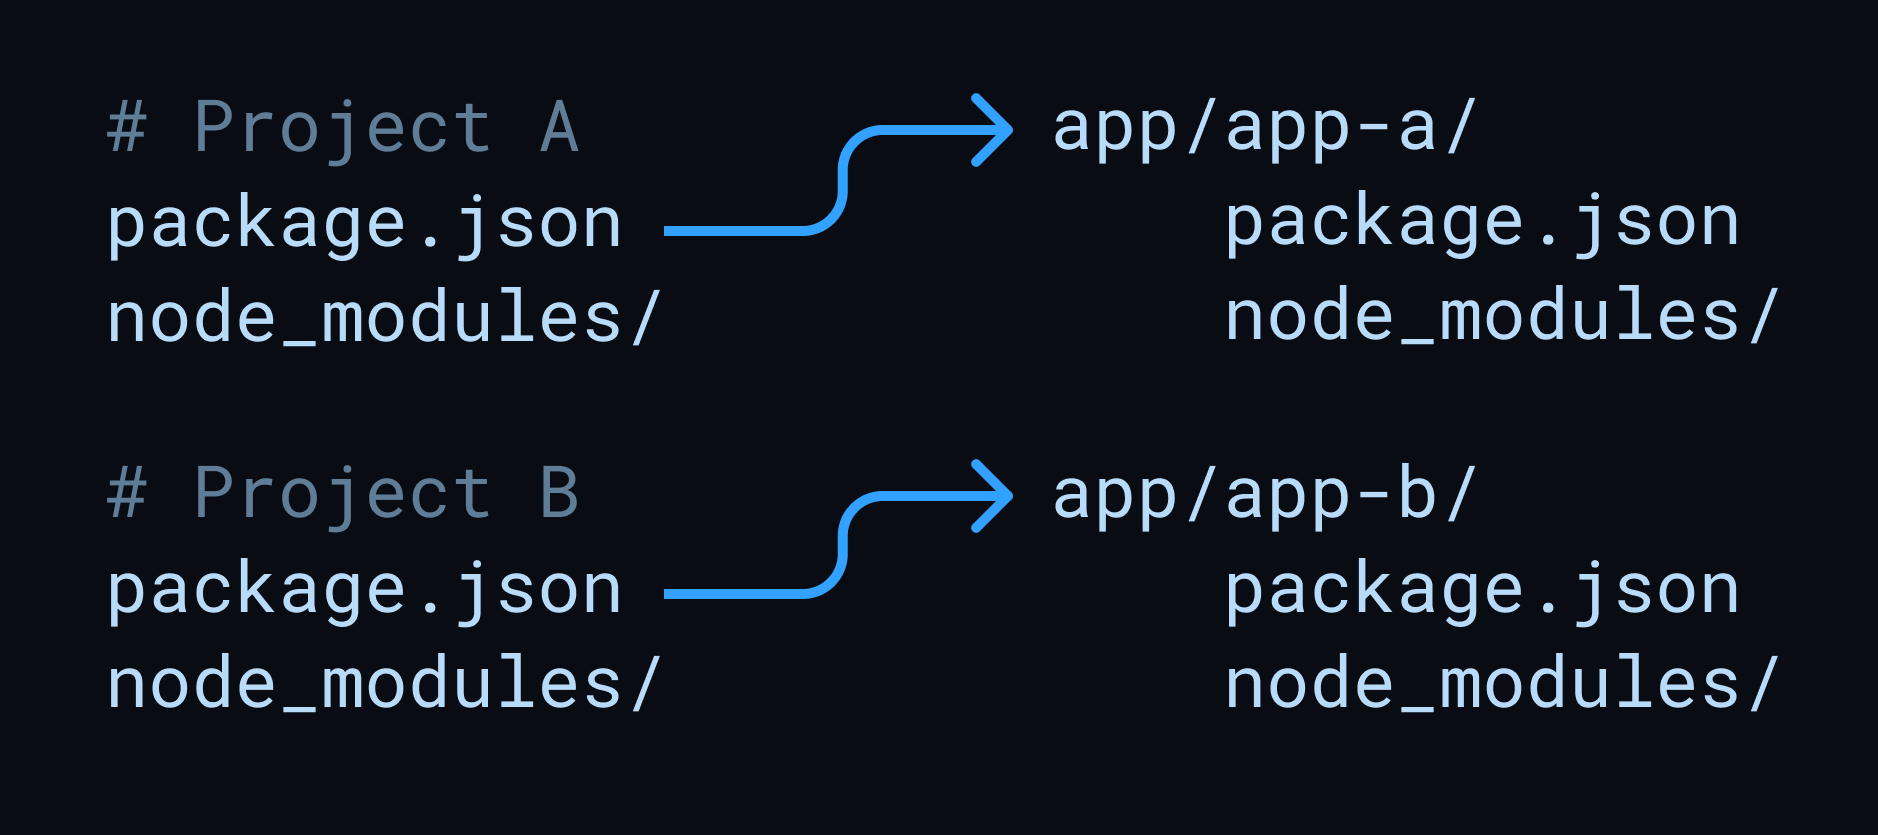
But you also need to consider the versions of external dependencies that your shared code in packages/ will use.
If packages don’t specify their dependencies, then the interface and behavior of those dependencies will be determined by the app that imports the package. That’s a recipe for disaster, so your packages will also need to specify dependencies
This introduces some problems for the apps making use of shared packages.
Bundle size
When different packages can specify different versions of dependencies, multiple versions of dependencies may be included in the JS bundle sent to the client. This can easily go undetected.
Singletons
A lot of libraries export singletons with shared state, for example, the Router class in Next.js.
Singletons imported from such libraries are no longer guaranteed to be singletons globally. Each version of the library instantiates and exports its own singletons. This leads to very tricky bugs.
Tech debt accumulation
When developers need to upgrade a dependency in one project, it’s tempting to skip upgrading the dependency for all projects.
This inevitably leads to the dependencies of some projects slowly drifting out of date.
TL;DR: Use a single-version policy
In addition to eliminating the aforementioned problems, there are numerous benefits to a single-version policy.
- External dependencies work the same in every project, making working across projects easier.
- Common logic in your applications can more easily be extracted to shared packages.
- In being able to make more assumptions, tooling and infrastructure can be simplified.
The main drawback of a single-version policy is that upgrading dependencies becomes harder. Every app and package making direct use of the dependency being upgraded will need to be updated.
However, the difficulty of upgrades can be circumvented by creating packages that abstract away the API of external dependencies. Using this approach, only the package that is abstracting away the dependency needs to be touched.
Config files
One of the core reasons for moving to a monorepo tends to be reducing friction and making cross-project work easier. A developer moving from one project to another should be able to get up to speed and be productive quickly.
This becomes easier when differences across projects are minimal.
In a monorepo, project-specific configuration should be as minimal as possible. For your monorepo, create config files in the root and extend those in project-specific config files.
{"extends": "../../tsconfig.base.json","compilerOptions": {"rootDir": "./",},"include": ["src/**/*.ts"]}
The project-specific config files should be kept as small and simple as possible.
Before merging the repositories, each repository will contain its own config files. We will want to combine config files that exist in both repositories into common config files in the root.
There will be some differences, which you can resolve by creating project-specific config files that extend the root and override as needed.
You can try to resolve minor differences, but don’t go overboard. Trying to resolve every difference will suck up a lot of time and make it harder for the merge to pass review. Be practical and override where needed. The configs can be unified over time.
Merging the repositories
We have two standalone repositories, A and B, which we intend to move to a monorepo. A has been designated to become the monorepo destination, so we will be merging B into A.
Create a branch in each repository where the directory structure is “as-if” the repositories were already merged. Make sure that everything still works (CI is green, scripts work as expected).
Once the directory structure is ready, we have two “pre-merge” branches ready:
prepare-merge-bin repoAmerge-into-ain repoB
Let’s zoom out and take a look at the next steps.
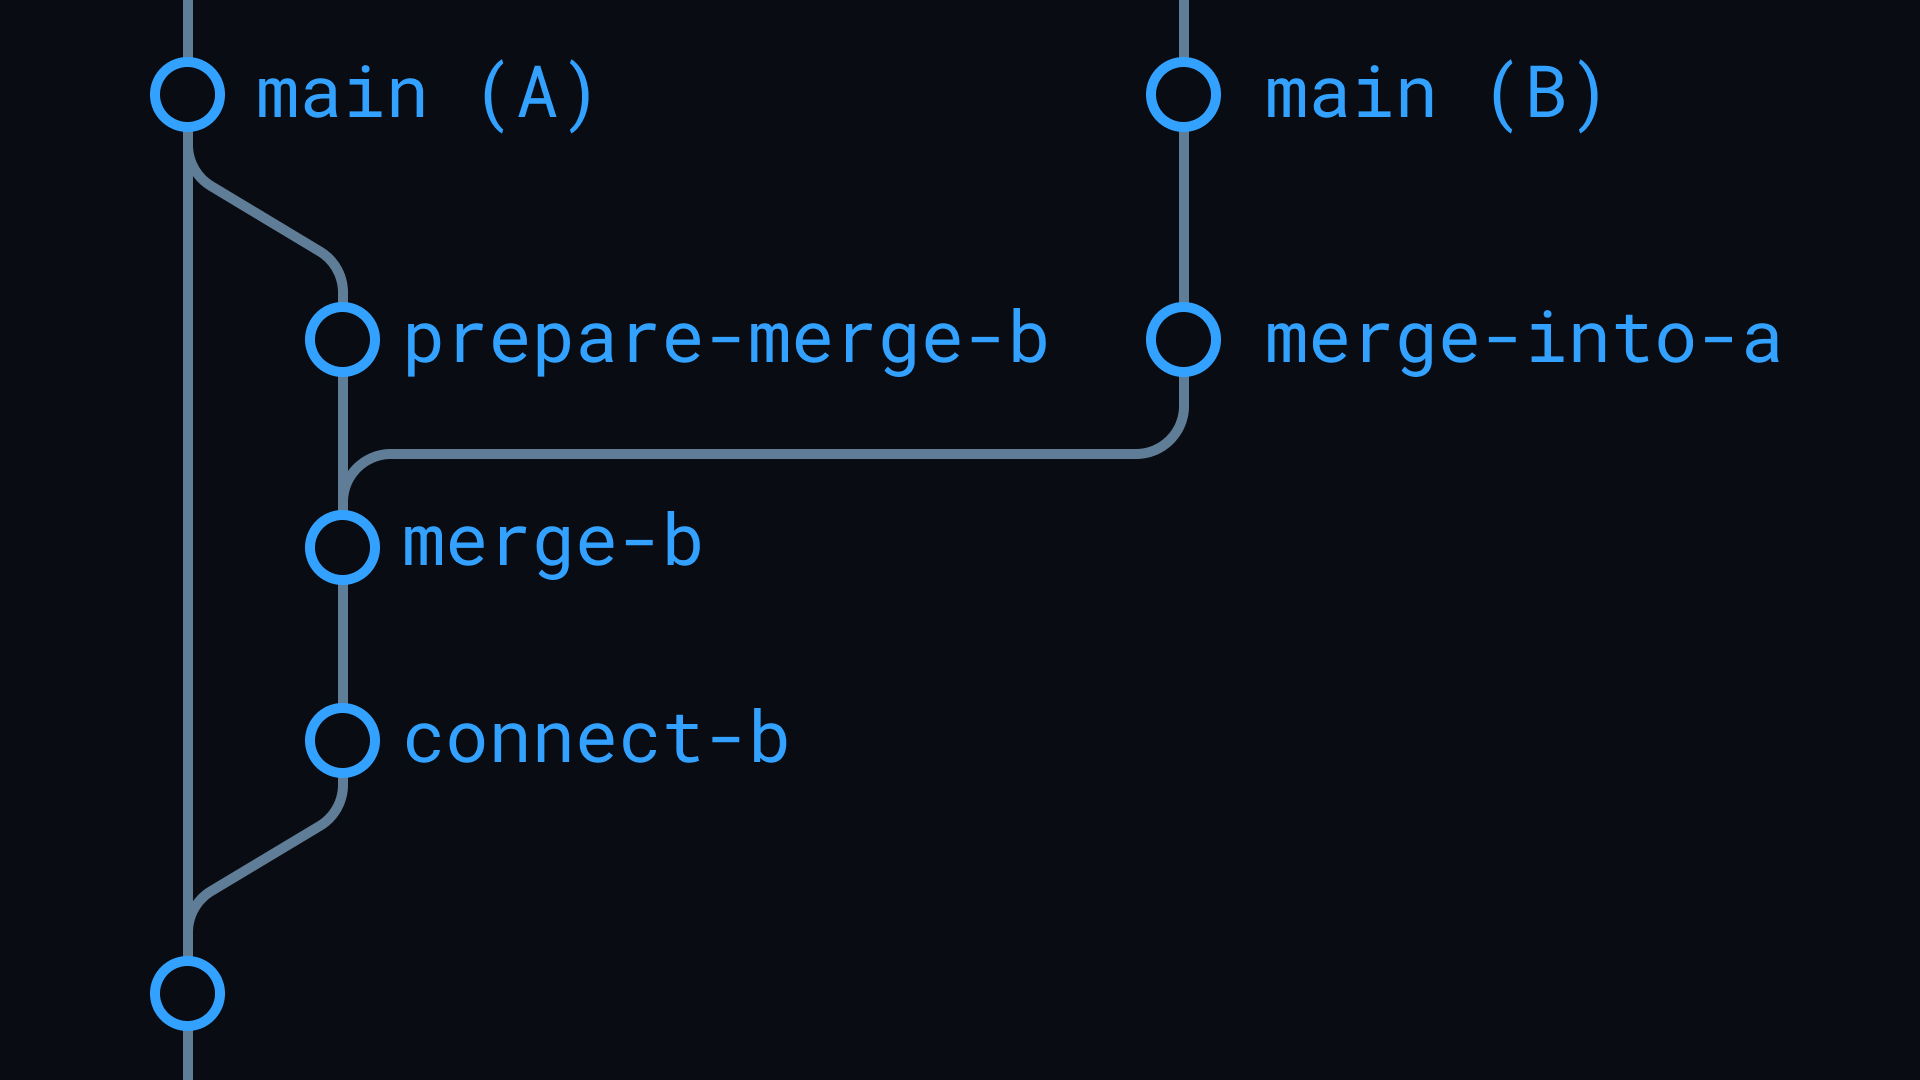
The process can be described like so:
- Create pre-merge branches for
AandB. - Create a branch from the pre-merge branch in
Aand mergeBinto it (we’ll get to how later). - Resolve the differences and get everything working.
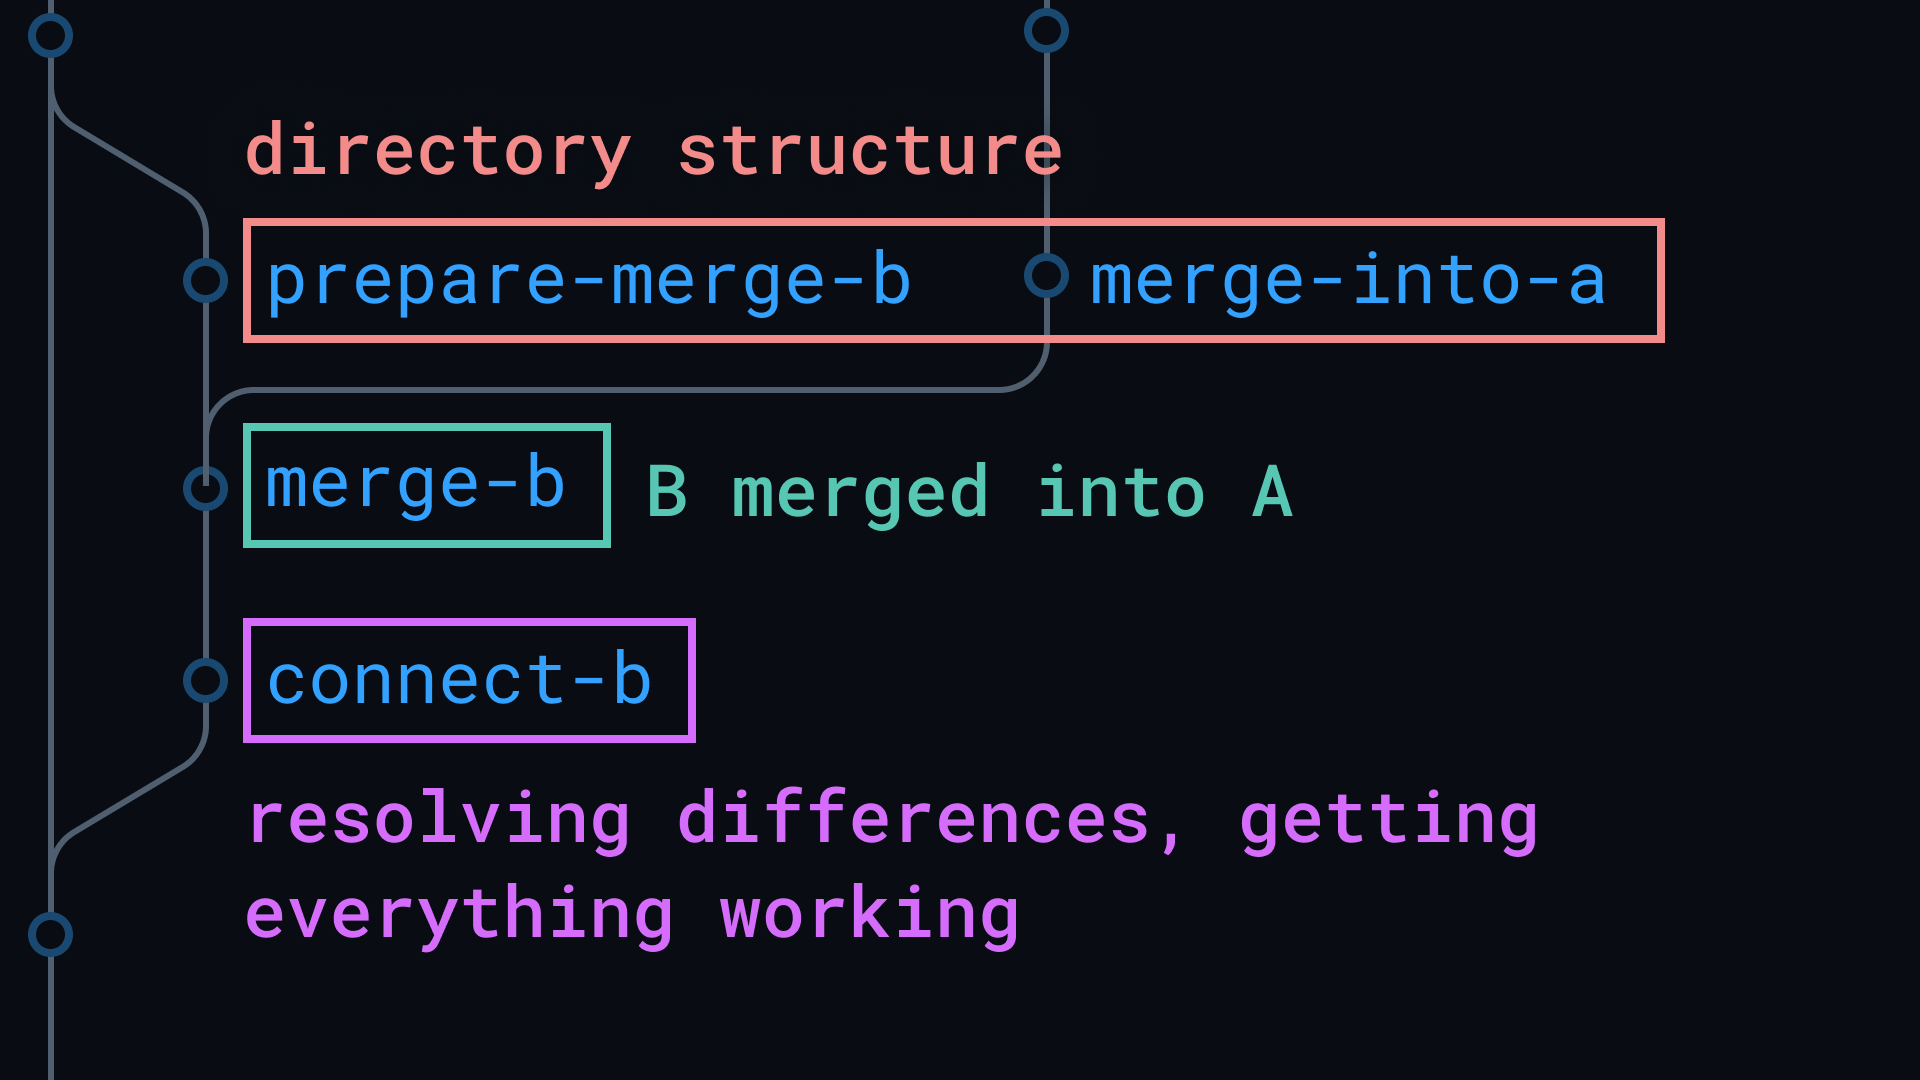
Separating these stages makes the code review phase easier by making the changes made in each phase independently reviewable.
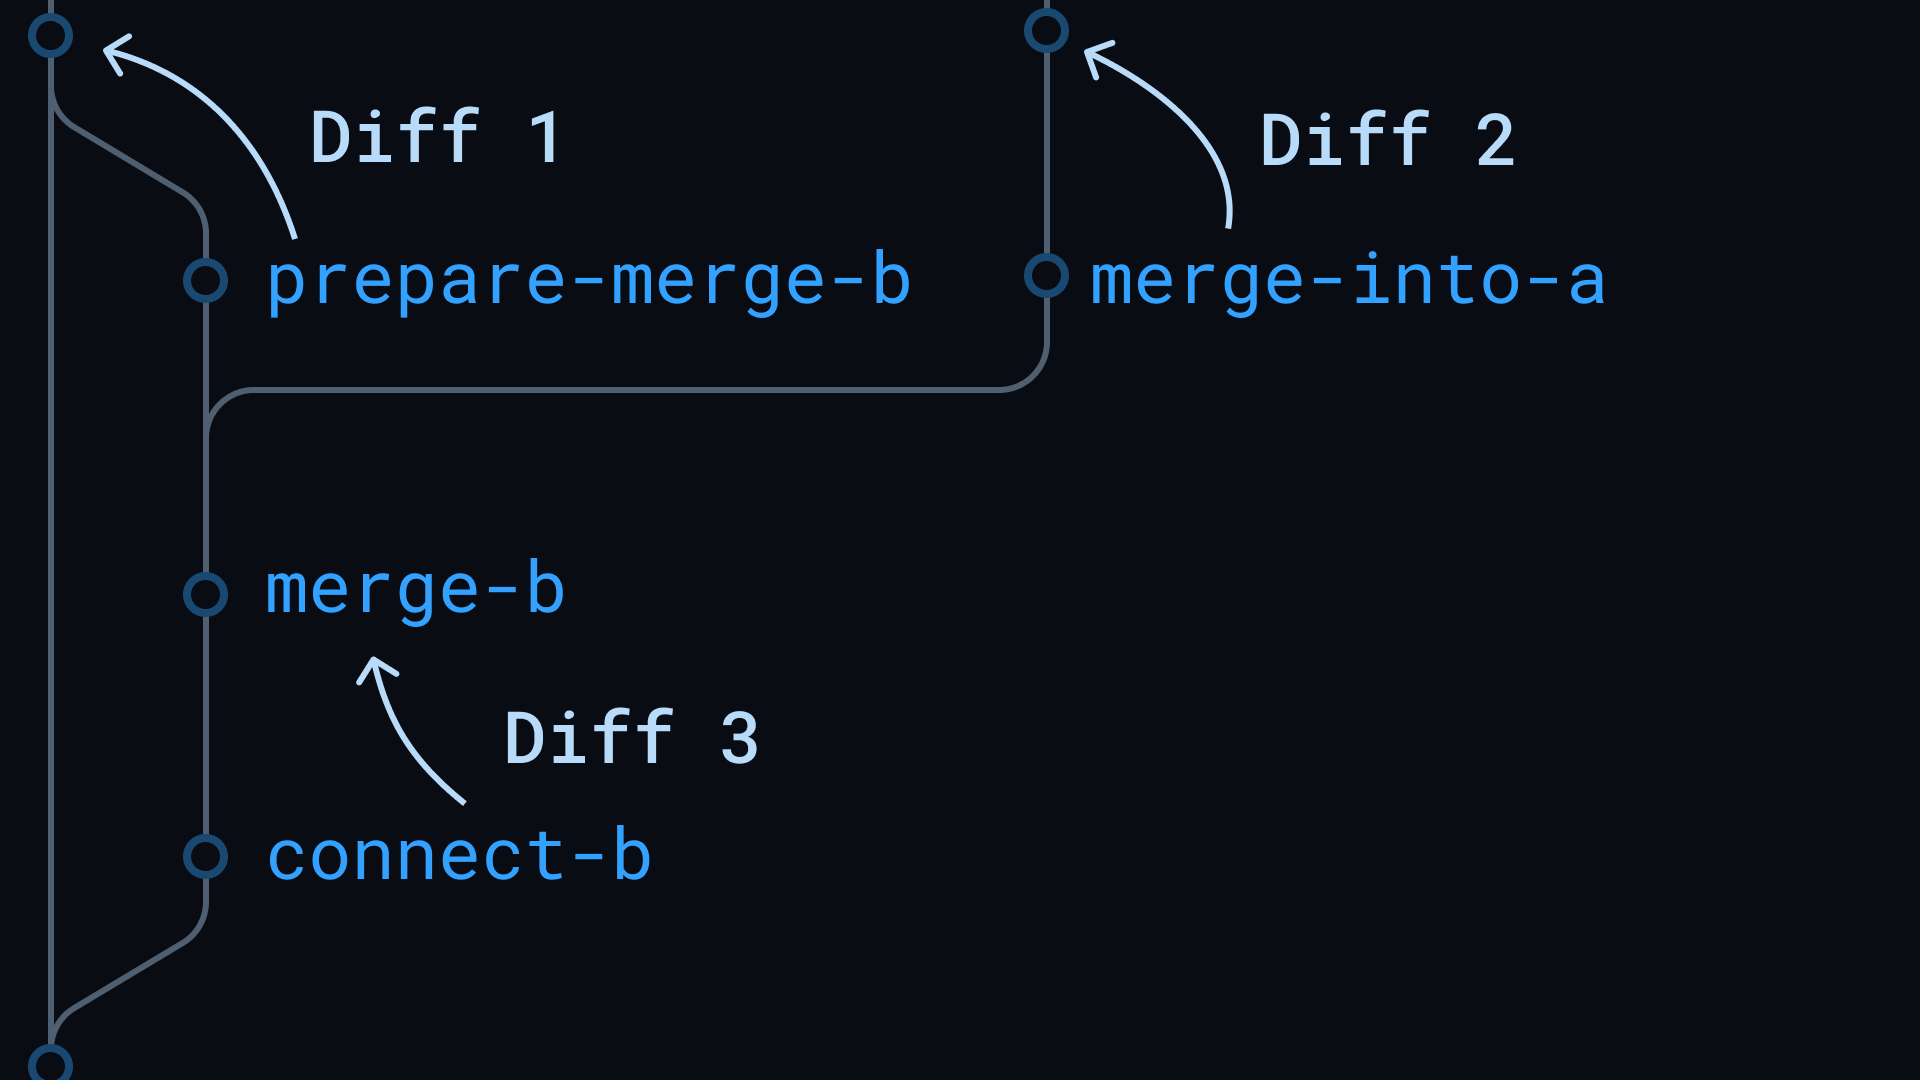
- Diff 1 and 2 enable reviewing the changes made when changing the directory structure.
- Diff 3 enables reviewing the changes made in connecting
AandBand getting everything working.
Merging repositories is quite noisy, and reviewing a single “big-bang” PR is very hard. Even though the changes will all be merged into A at the same time, we can still review them separately.
Retaining Git history
Copy-paste is not the way to go because the Git history of B would be lost. Git has a way to merge repositories without losing history.
Given that you are in repository A, you can merge B into A like so:
git checkout merge-bgit remote add app-b <URL of repo B>git fetch app-bgit merge app-b/merge-into-a--allow-unrelated-histories
We can break this down like so:
# Go to the branch that we want to merge B intogit checkout merge-b# Add repository B as a remote. In this example, we're# adding B as a remote under the name `app-b`.git remote add app-b <URL of repo B># Fetch the branches in Bgit fetch app-b# Merge the branch named `merge-into-a` from B (`app-b`)# into the current branchgit merge app-b/merge-into-a# The `--allow-unrelated-histories` option is a way to# make Git allow us to merge A and B, despite them# sharing no history--allow-unrelated-histories
After the merge
The merge-b branch now contains the files from B’s pre-merge branch. The next step is getting everything hooked up and working. Before doing that, create a connect-b branch from the merge-b branch to be able to review those changes separately, as mentioned earlier.
Most notably, you will need to get the existing CI/CD pipelines for both projects working together. Once the CI pipelines are green and you’ve got everything working, we can put your changes up for review.
CI/CD in a monorepo
The hardest technical challenge for monorepos is the CI/CD pipeline. Over time, things will slow to a crawl under a “run everything, always” approach.
You can test and build the apps in parallel to speed things up. However, this can get very expensive in CI minutes. At some point, monorepos have to start only running CI/CD for the apps affected by the change.
But be practical. While there are only two projects in the monorepo, running the CI pipelines for both apps while getting the monorepo up and running is perfectly fine. But as the monorepo grows, this becomes untenable.
Monorepo tooling
You don’t need a monorepo tool, though they certainly help.
I’ve had a positive experience with Nx before. Its print-affected command allows you to see which apps were affected by the changes between two commits or branches. Really useful for CI/CD!
Nx has a suite of features geared towards monorepos. But keep in mind, you don’t have to buy into a monorepo tool wholesale. In the monorepo I set up at a previous workplace, we only used the print-affected command from Nx. Nothing else.
A notable competitor in the JS monorepo space has been Turborepo. I don’t have personal experience with it yet, but I’ve heard good things about it.
Final words
Moving existing repositories to a monorepo is not a trivial task. I hope this post provided you with insight into how you might go about that process yourself.
To be notified of new posts, subscribe to my mailing list.